
Epoxy Driveways on the Gold Coast: A Professional Installation Guide
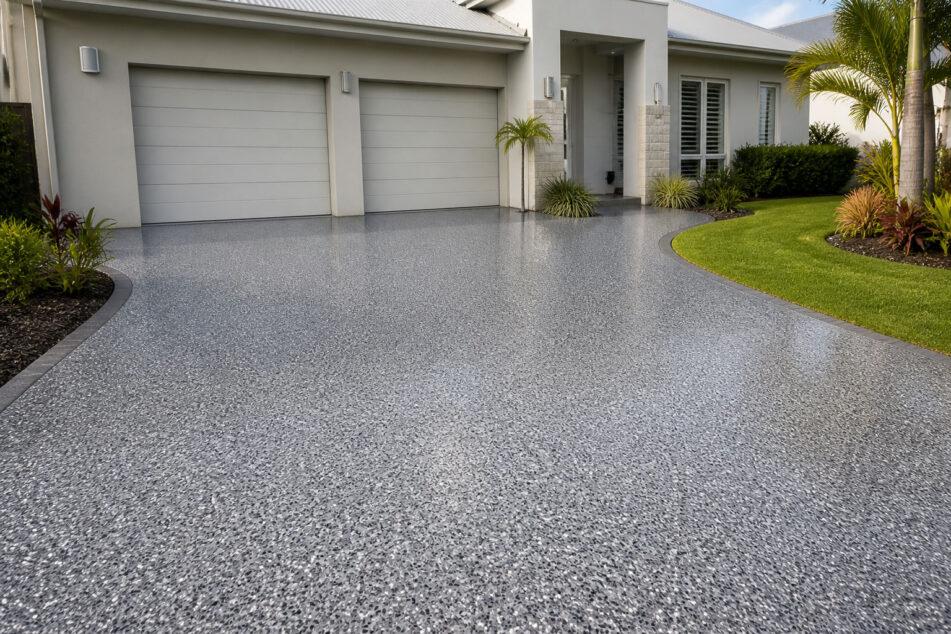
Can I put epoxy on my driveway, and will it last? That’s the question most homeowners walk in with, and the short answer is yes — an epoxy driveway can hold up for years in full Gold Coast sun. But it only works when the topcoat is UV-stable, and the slab underneath has been prepared properly. Most of the failed epoxy jobs I see come back to one of those two things being wrong.
Over the last twenty years, I’ve laid plenty of epoxy driveways on the Gold Coast and Redlands — and seen the failed DIY attempts too. Spray Your Concrete uses Durable Concrete Coatings systems with aliphatic (non-yellowing) polyurethane topcoats, which is what handles the UV outdoors. This article walks through what makes an outdoor epoxy system different, when it’s the right call (and when resurfacing fits better), and what a proper install actually looks like on site.
What Makes an Epoxy Driveway Different from an Indoor Epoxy Floor
Not all epoxy is the same, and this is where most outdoor jobs go wrong. An epoxy driveway is exposed to things an indoor floor never deals with — full sun, tyre traffic, hot slabs, and big temperature swings between morning and afternoon. The epoxy laid in a kitchen or a showroom isn’t built for any of that. Put a standard interior-grade system outside and within a year or two, you’ll see it yellowing, chalking, and losing its colour.
Free On-Site Quotes, Gold Coast to Redlands
We come out, look at the surface, and give you a written price. No charge, no obligation.
External epoxy flooring is a different build. The basecoat goes down in your chosen colour, but the layer that finishes the job is a UV-stable polyurethane topcoat. That’s the layer doing the hard work outdoors — handling the sun, the heat, the tyres, and the wear.
We use Durable Concrete Coatings systems on every epoxy job, and for outdoor work, that means specifying the polyurethane topcoat as part of the build. Without it, you don’t have an outdoor system. You have an indoor system on the wrong slab.
When an Epoxy Driveway Is the Right Call (and When It Isn’t)
Epoxy isn’t always the right call for a driveway, and a good installer should tell you that up front. Where epoxy works best is on shorter driveways where the homeowner wants a high-end, seamless finish — the decorative flake look in particular sits beautifully on a driveway that runs up to a garage where epoxy is already laid inside. If kerb appeal matters, the slab is in good condition, and the design is doing some work for the property, an epoxy driveway is a strong call.
On a long, exposed driveway in full sun where the budget is the key driver, I’ll usually recommend resurfacing the driveway instead. A textured covercrete finish handles big square-metreage jobs more economically, and the texture itself hides hairline cracks better than a smooth coating. If the slab has wider cracks or signs of movement, that’s another point where resurfacing is the better fit — epoxy won’t bridge a slab that’s still moving, and neither will a coating system. Nine times out of ten on a long, exposed driveway, the textured covercrete is what I’ll quote.
If you’re still weighing up whether to go epoxy or resurface, it’s worth reading through the difference between epoxy and resurfacing systems before booking a quote — it covers the side-by-side that this article doesn’t.
Finishes Available — Solid Colour, Decorative Flake, and Metallic
An epoxy driveway coating can be finished in three main ways, and each one suits a different kind of property.
A solid colour finish is the cleanest, simplest look. The basecoat is laid in your chosen colour and sealed with the polyurethane topcoat — no flake, no broadcast, just a smooth, uniform surface. It’s the most economical option, but a solid colour also shows scuffs, tyre marks, and wear more obviously than a textured finish. On a working driveway, that matters.
Decorative flake epoxy is the all-round best fit for most driveways, and it’s what I quote most often. We use the Colour Flake™ system from Durable Concrete Coatings — coloured chips broadcast by hand into the wet basecoat, then sealed under the polyurethane topcoat. The flake adds slip resistance underfoot, hides minor scuffs, and gives the driveway a finish that lifts kerb appeal. There’s a wide colour range — I’ll bring samples through at the on-site quote so you can see what suits the home.
Metallic epoxy gets asked about occasionally. It looks great indoors, but it’s rarely the right call on a driveway — too smooth for tyre traffic and too dramatic for an outdoor surface. I’ll mention it for completeness, but I almost never lay it on a driveway.
What a Professional Epoxy Driveway Install Actually Involves
Knowing what a proper install looks like is the best way to judge whether a quote you’ve been given is fair. The process below is what I run on every epoxy driveway job — six steps, in this order, every time. Skip any one of them and the finish won’t last.
Step 1 — Diamond grinding
I run a diamond grinder over the entire slab to open the surface and give the primer something to bond to. This is the single biggest reason DIY kits fail — a wire brush or an etch primer can’t replicate what a mechanical grinder does. There’s no shortcut here, and it’s not a job a homeowner can do without the equipment.
Step 2 — Primer coat
Once the slab is ground and clean, I’ll check moisture levels in the concrete before priming — a slab that’s reading too wet will reject the bond no matter what product goes on top. With moisture testing done and the substrate dry enough, a bonding primer goes down. This layer locks the epoxy basecoat to the existing concrete. Get the primer wrong — wrong product, wrong moisture conditions, wrong cure time — and the whole system lifts down the track.
Step 3 — Basecoat
The pigmented epoxy basecoat is rolled out in the chosen colour. On a flake job, the timing matters — the next step has to happen while the basecoat is still wet, so I’m working to the cure window of the product, not the clock.
Step 4 — Flake broadcast
Decorative flake is hand-broadcast into the wet basecoat. It looks easy, but coverage is judged by eye and takes years of practice to get right — full coverage across the whole driveway is what gives you the best wear surface and the cleanest finish.
Step 5 — Vacuum
After the basecoat has cured, I vacuum the entire slab to lift any loose flake. This step is what lets the polyurethane topcoat lock in evenly. Skip it, and you get an uneven seal — the topcoat sits on flake debris instead of bonding properly.
Step 6 — Polyurethane sealer (two coats)
Two coats of UV-stable polyurethane topcoat finish the job. This is the layer that handles the sun, tyres, chemicals, and wear — the part DIY kits leave out entirely. This is the process I use on every epoxy driveway I install, and it’s what separates a system that lasts from a coating that peels.
Why DIY Epoxy Kits Don’t Work on Outdoor Driveways
Most of the failed epoxy driveway paint jobs I’ve been called out to look at went wrong for the same three reasons.
First, DIY kits use interior-grade resin. It’s not built for full sun, and it yellows and chalks within the first year on a Gold Coast driveway. The colour you signed up for isn’t the colour you end up with.
Second, the prep can’t be replicated by hand. DIY kits ship with a wire brush or an etch primer, and neither one opens the slab the way diamond grinding does. Without proper mechanical prep, the coating doesn’t bond — and that’s where peeling and hot-tyre pickup come from, indoors as much as out. It’s the same reason DIY epoxy garage kits lift off the slab under cover. You’ll often see lifting first under the wheels and along the expansion joints, then around the edges, then everywhere.
Third, external epoxy flooring needs a UV-stable polyurethane topcoat over the basecoat. DIY kits don’t include one. Without that topcoat, the system has no UV protection at all — and the cure on the basecoat alone won’t carry the job outdoors.
If you’ve already tried a kit and it’s lifting, that’s something we can fix — strip back the failed coating, prep the slab properly, and lay a system built for outdoor use. Send a photo through with your quote enquiry, and I’ll let you know what’s involved.
How Long an Epoxy Driveway Lasts on the Gold Coast
How long does an epoxy driveway last on the Gold Coast? A properly installed system — basecoat, flake (if you’ve gone that way), and a UV-stable polyurethane topcoat — will typically hold up for 10 to 15 years or more before it needs attention. The topcoat is the part that ages first.
What shifts that range is the conditions the driveway is dealing with. The subtropical climate up here is hard on outdoor coatings — high UV, hot slabs, heavy summer rain — and a north-facing driveway in full sun ages faster than one shaded for half the day. Heavy vehicles, daily tyre traffic, and harsh chemicals all cut into the topcoat life. Prep quality at install time sets the ceiling: a coating that wasn’t ground and primed properly won’t reach 10 years no matter what’s laid on top.
The good news is that when wear shows, you’re usually only refreshing the topcoat, not the whole system. Epoxy driveway resurfacing in this case means a clean, a light scuff, and two fresh coats of polyurethane — the basecoat and flake stay where they are. That’s a much smaller job than the original install, and it resets the life clock on the surface.
Frequently Asked Questions
Get a Quote for Your Driveway
Epoxy works on a Gold Coast driveway when the system carries a UV-stable polyurethane topcoat, and the prep is done properly — that’s the gate, and everything else flows from it. The six-step install we run on every job — grinding, primer, basecoat, flake broadcast, vacuum, and polyurethane sealer — isn’t something a kit can replicate. If you want to know whether an epoxy driveway is right for your slab, the simplest thing is to have someone come and look at it. We’re a family-owned business established in 2012, QBCC Licence #1205294, servicing the Gold Coast to Redlands — request a free on-site quote for professional epoxy driveway installation or call 1800 954 449, and I’ll come out and give you a straight answer.

