
Resurface Stencilled Concrete: 3 Options to Refresh an Existing Surface
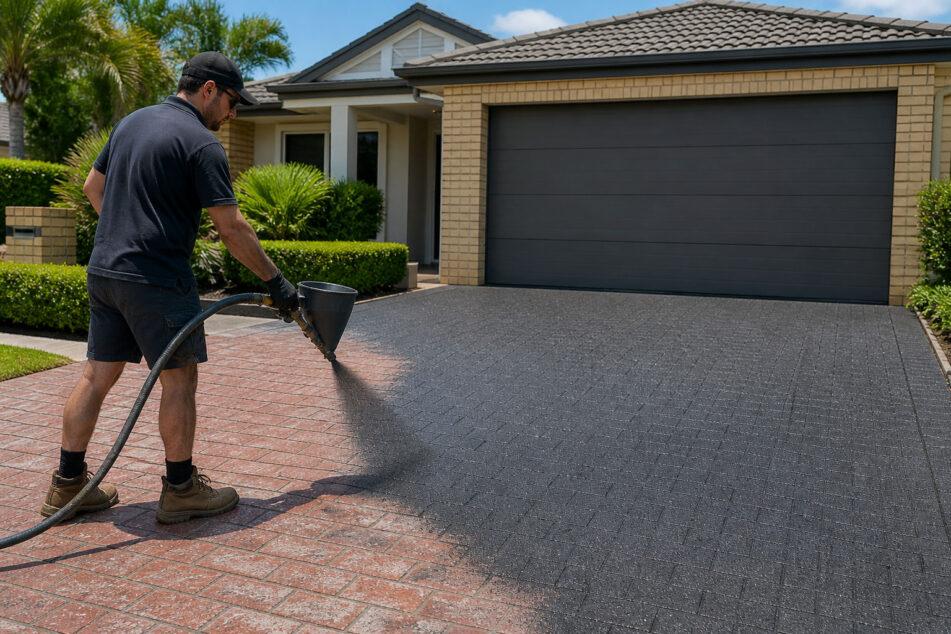
Most of the resurfacing jobs I quote on faded stencilled driveways start with the same question — can it be saved without ripping the slab up? Nine times out of ten, yes. You can resurface stencilled concrete and end up with a surface that looks better than the original.
There are three ways to do it: keep the existing pattern and refresh it, lay a brand-new stencil pattern over the top, or cover the stencil entirely with a solid flecked covercrete finish. Which one suits your place depends on the condition of the surface underneath, what you actually want it to look like, and your budget. After 20 years on the tools across the Gold Coast to Redlands, I’ve laid all three more times than I can count, and this article walks through how each option works and when I’d recommend it.
Why Patching and Painting Won’t Last
Before getting into the three resurfacing options, it’s worth saying what doesn’t work. Patching cracks with concrete filler and giving the whole thing a coat of paint is the cheap fix most homeowners try first. It looks alright for about a year. Then the patches go a different colour to the rest of the surface, the paint starts peeling at the edges where water sits, and you’re back where you started — except now there’s flaking paint on top of a faded stencil.
Free On-Site Quotes, Gold Coast to Redlands
We come out, look at the surface, and give you a written price. No charge, no obligation.
Resurfacing is different because it’s a system, not a coat of paint. The old surface gets pressure-washed, the cracks get repaired properly, and a professional stencilled concrete coating goes down on top — bonded, sealed, designed to last 10 to 15 years on a residential surface. It costs more than a tin of paint, but it lasts ten times as long.
Option 1: Refresh the Existing Stencil Pattern
If you like your existing stencil and the underlying concrete is sound, the simplest option is to resurface and lay the same pattern back down. The old surface gets cleaned and prepped, any cracks get repaired, and the stencil is reapplied during the resurfacing process — not over the top of the old one, but as part of the new coating system.
This is also where you can change the colour without changing the design. A faded terracotta stencil that’s been baking in the Gold Coast sun for fifteen years can come back as a charcoal grey, a sandstone, or anything from the Dulux Avista stencilled range. I use Dulux Avista for stencilled work because it’s the system designed for stencil applications — it bonds well into the pattern, holds the colour, and finishes clean. There are 20 standard colour options in the range, plus tinted variations.
Cost-wise, relaying a stencil pattern sits at the higher end of resurfacing pricing — there’s more labour involved than a plain finish. The exact figure depends on the complexity of the pattern and the size of the area, which is why I’ll always come out and look at the job before quoting.
Option 2: Lay a New Stencil Pattern
If your existing stencil is dated — a lot of the diamond and herringbone patterns laid in the 90s and early 2000s look their age now — you can resurface and lay a completely different pattern on top. Same process, different stencil.
This is the option I get asked about most when someone’s bought a place with a stencilled driveway that doesn’t suit the look they want. Cobblestone, brick, ashlar, sandstone tile, and custom patterns are all available. If you’re trying to pick something, the stencil concrete patterns article on our site has visual examples of what’s currently available. It’s also worth thinking about whether a stencilled or textured finish suits the look you’re after — they’re different processes with different results.
Cost is similar to relaying the same stencil. The work involved is the same — what changes is the design, not the labour.
Option 3: Cover the Stencil with Flecked Covercrete
This one’s been getting more popular over the last few years. Instead of relaying any stencil, you cover the old surface entirely with a solid covercrete finish — usually with decorative flecks for texture and visual interest. The most popular version is what people call a salt-and-pepper finish: a grey base with black and white flecks. There are plenty of other combinations too — earthy tones, charcoal-on-cream, light greys with subtle darker flecks.
This option suits anyone who wants a contemporary, low-pattern look. It’s the most modern of the three, and it’s also the cheapest — from $50 per square metre — because there’s no stencil work involved. For a typical 30-square-metre driveway, that’s around $1,500. The Covercrete spraycrete system is the underlying base for all our resurfacing work, and a flecked finish over an old stencil is one of the cleanest transformations you can do.
Worth knowing: once you cover a stencil with solid covercrete, you can’t easily get back to a stencilled look without resurfacing again. So it’s worth being sure you don’t want to keep some kind of pattern before going this direction.
How We Resurface a Stencilled Surface
All three options follow the same prep-and-coating sequence — what changes is whether a stencil is laid during the coating stage. The step-by-step covercrete process goes into more detail, but in short:
- Pressure-wash the existing surface to remove dirt, grease, and loose material.
- Repair any cracks or surface damage in the old concrete.
- Apply a bonding primer.
- Lay the coating system — three top coats, with the stencil applied during this stage if you’ve chosen Option 1 or Option 2.
- Apply two coats of clear sealer to finish.
On a typical residential driveway, the whole job takes one day for the application, plus a curing period before you can drive on it. We schedule the work so you’re without the driveway for as short a time as possible.
Which Option Suits Your Place
Quick rule of thumb based on what I see most often:
- Like the existing stencil, just want it to look new again — Option 1 (refresh the same pattern, optionally change the colour).
- Hate the existing stencil but still want a pattern — Option 2 (new stencil).
- Want a more modern, low-pattern look or trying to keep costs down — Option 3 (flecked covercrete).
Where it gets less straightforward is when the underlying slab has bigger problems — wide cracks, sections that have shifted, areas where the original concrete is breaking up. Resurfacing covers cracks up to about 3mm. Anything wider has to be repaired before the new coating goes down. If the slab is moving, no resurfacing system will hold, and that needs to be sorted first. I’ll always check the condition of the slab before quoting and tell you straight if resurfacing isn’t the right call.
Frequently Asked Questions
Get a Quote
If you’ve got a tired stencilled driveway, patio, or path and you’re trying to work out what to do with it, the easiest thing is to have someone come and look at it. I do free on-site quotes across the Gold Coast to Redlands — I’ll tell you which of the three options suits your slab, what it’ll cost, and how long it’ll take. Have a look at our stencilled concrete service page for more on what we do, or get in touch to book a quote.

