
Spray-on Paving Gold Coast: A Paver Look Without Replacing the Concrete
Spray-on paving is a thin, polymer-modified cement coating sprayed over an existing concrete slab — around 3mm thick once it’s all down — that gives you the look of pavers without lifting and re-laying anything. On a tired driveway, patio or pool surround, it’s the difference between a one-day refresh and a two-week excavation. In my twenty years on the tools, it’s the system I quote on most often when a homeowner wants the paver look without the bill, the noise, or the rubble.
A few things to get straight up front. Spray-on paving isn’t paint, sealer, or a thin colour wash. It’s a sprayed cementitious system applied in three top coats with two sealer coats over the top, designed to bond into the slab and hold up under cars, foot traffic and Gold Coast UV. At Spray Your Concrete (QBCC Licence #1205294), we install it across the Gold Coast and the Tweed using one of two product systems depending on the finish.
Here’s what the technique involves, where it works, and where it doesn’t.
Ready to Revitalise Your Surfaces?
Contact Spray Your Concrete today for all your Gold Coast concrete resurfacing, epoxy flooring, and tile removal needs.
What spray-on paving actually is
The technique sits in the resurfacing family. The trade names you’ll see for the same general method include covercrete, spraycrete, and spray pave — all describing a spray-applied cementitious overlay that goes onto existing concrete.
The system is around 3mm thick once finished. That matters because it means the new surface follows the existing slab — its falls, its drainage, its boundary line. It’s not a structural fix; it’s a finish.
The two products we use:
- Shieldcoat Step Safe Heavy Duty for non-stencil work — plain colour, textured, and flecked finishes. It’s a P5-rated anti-slip coating (the highest anti-slip rating available, which matters around pools and on driveways), with anti-mould additives in the resin and a 7-year Shieldcoat manufacturer warranty against flaking, peeling and cracking.
- Dulux Avista for stencilled finishes specifically. It’s the better-suited system for stencil work, where the pattern needs to lay down cleanly under the texture coats.
If you’ve been reading about the technique and seen “covercrete” or “spraycrete” in the same breath, that’s why — it’s the underlying covercrete/spraycrete system that delivers the finish.
How it goes down
The on-site application follows the same five steps regardless of which product we’re using.
- Cleaning. The existing concrete is pressure-washed to strip dirt, grease and surface contamination. If the slab has oil staining that won’t lift, that needs sorting before we go further — coatings won’t bond through contaminated concrete.
- Crack repair. Any cracks or surface damage are repaired before coating starts. Resurfacing covers hairline cracks under about 3mm; anything wider needs to be filled and stabilised first.
- Primer. A bonding primer goes down to lock the system into the slab.
- Three top coats. The chosen product is applied in three coats, building up the texture and colour. For stencilled finishes, the stencil is laid during this stage and lifted to reveal the pattern.
- Two sealer coats. Clear sealer goes on as the final layer, providing UV, stain and wear protection.
Most residential jobs are done in a day on the tools. Walk on it next day, drive on it after about two days depending on the weather.
Spray-on paving vs traditional pavers
Both have their place. The spray-applied option wins on cost, time, and disruption. Real pavers win on movement and modular replacement.
- Cost. A spray job runs at a fraction of the cost of laying real pavers. There’s no excavation, no base prep, no individual unit laying, no jointing sand.
- Time. A residential driveway is usually a one-day job. Pavers on the same area run to a week or more once you factor in excavation and base.
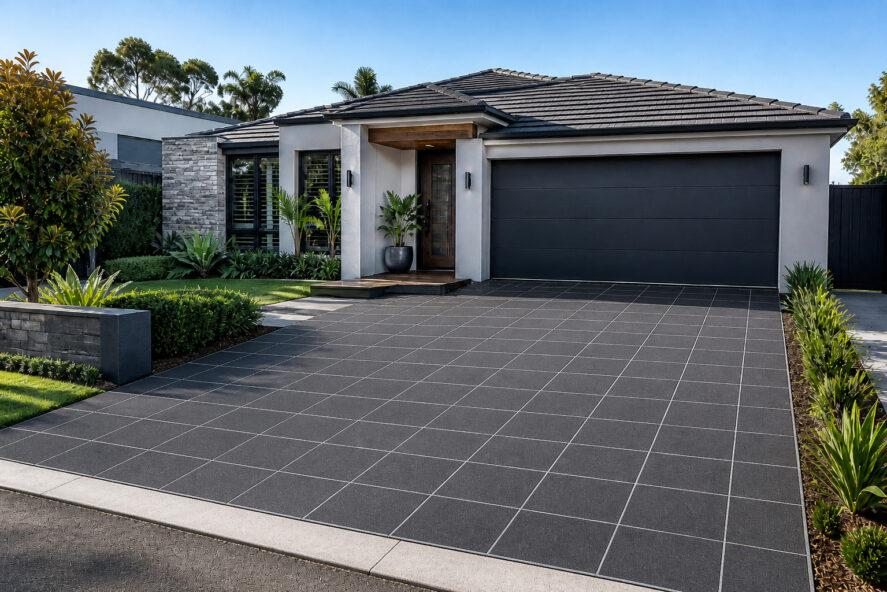
- The look. Stencilled spray paving genuinely replicates a paver appearance — cobblestone, brick, tile, herringbone — to the point where most people walking past wouldn’t pick the difference.
- Movement. This is where pavers have an edge. Real pavers can shift and be lifted and re-laid. A coating is bonded to a slab, so if the slab moves, the coating moves with it.
- Replacement. A damaged paver can be pulled and swapped. A coated area is patched and recoated — possible, but a different process.
For most Gold Coast homes with a sound existing slab, the spray-applied option gives you the paver look at a fraction of the spend. If your slab is breaking up or moving, that’s a different conversation.
Pattern, texture and colour options
Plenty of flexibility once it’s down.
Paver-look stencilled finishes are the closest match to a traditional paving appearance — cobblestone, brick, tile and herringbone are all standard patterns. If a stencilled finish is the angle you’re after, the stencilled concrete page goes deeper into pattern options.
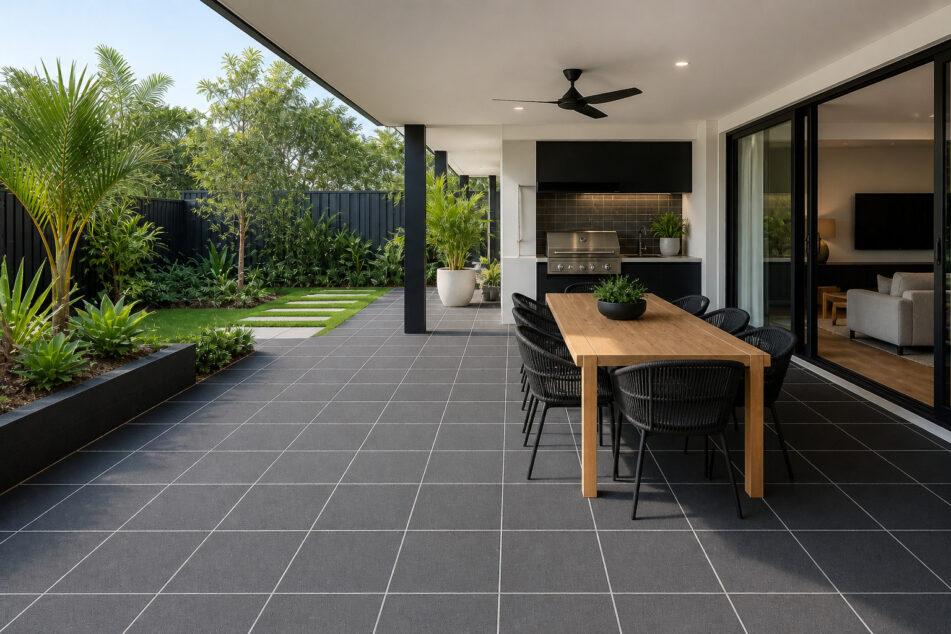
Non-stencil finishes give you texture without a defined pattern. Flecked finishes (two or three colours combined in the spray) hide hairline cracks better than a single block colour and are a strong call for driveways. Textured finishes can mimic stone, slate or a broomed concrete look depending on the technique used.
Step Safe Heavy Duty comes in 33 standard colours and can be tinted to almost any custom colour, so matching an existing colour scheme is straightforward.
Where spay-on paving works — and where it doesn’t
Worth being honest about both.
Where it works well:
- Sound concrete driveways with hairline cracks and tired colour — one of the most common applications, and where it pairs with driveway resurfacing more broadly.
- Patios and alfresco areas where you want a paver look without the cost of pavers.
- Pool surrounds, where the P5 anti-slip rating on Step Safe Heavy Duty earns its keep around water.
- Paths and walkways with an existing slab in reasonable shape.
Where it doesn’t:
- Cracked or moving slabs. If the underlying concrete is shifting, the coating will crack with it. That has to be sorted first, or the job needs to be replaced rather than resurfaced.
- Slabs with significant level issues. A coating follows the slab’s contours. If your slab has a hump or a low point that bothers you now, it will still bother you afterwards.
- Slabs with active oil saturation, especially in old garages and carports. The contamination has to be addressed first or the coating won’t bond.
- Existing interlocking pavers. People sometimes ask whether we can spray straight over old pavers. Honestly, rarely worth it — the joints, the lippage and the movement between units make for a poor substrate. Concrete slabs are the right starting point.
This is the bit where 20 years on the tools earns its keep. On an on-site quote, I’ll tell you straight whether the technique suits your particular surface, or whether you’re better off looking at something else.
How long will spraycrete lasts
Properly applied spraycrete, with a sound slab and the right prep, will last 10 to 15 years on a residential driveway. The Step Safe Heavy Duty system carries a 7-year manufacturer warranty against flaking, peeling and cracking — a Shieldcoat product warranty, not a workmanship claim, but it tells you how the manufacturer rates the system.
Maintenance is straightforward: an occasional wash and a re-seal every 5-7 years depending on UV exposure and traffic. For more on what drives the lifespan of these coatings, the durability of concrete resurfacing post goes deeper.
Frequently asked questions
Get a Spray-On Paving Quote Today!
If you’ve got an existing concrete driveway, patio or pool surround that’s tired but structurally sound, the spray-applied option is usually the most cost-effective way to give it a paver look without lifting the slab. The catch is that it has to be the right call for your surface — which is what an on-site assessment is for.
We do free on-site quotes across the Gold Coast and the Tweed. If you want me to come and look at your slab and tell you straight whether spraycrete suits it, book a free on-site quote and I’ll work it out with you in person.

